
Type: Day to Day Care
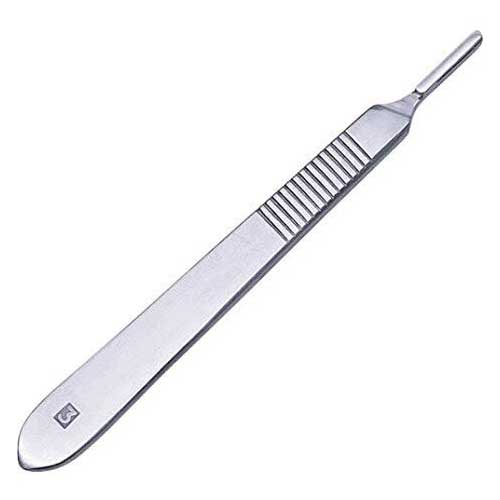
B P Handle Surgical Premium Quality (Pack of 4)
Collection:
Choosing the Right BP Handles and Holders
If you've ever felt a plastic cutter flex during a precise cut, you know the limitations of disposable tools. The professional upgrade is the BP (Bard-Parker) system, offering the stability that lightweight knives lack. Often recognized as surgical scalpels, these BP Handles & Holders function like a reusable razor: you keep the weighted grip and only replace the blade. This two-part design delivers the balance and control necessary for fine detail work.
BP (Bard-Parker) handles pair reusable, weighted grips with disposable blades to deliver greater stability and precision than plastic cutters. Match fitments correctly: small (Handles No. 3 and No. 7) with Blades 10, 11, 12, 15; large (Handle No. 4) with Blades 20, 21, 22. Assemble and remove blades using pliers or a blade remover and dispose of used blades in a sharps container; 316L stainless, autoclavable handles with non-slip grips enhance durability and control. A simple starter kit is Handle No. 3, No. 11 blades, and small pliers.
This guide outlines the BP (Bard-Parker) reusable handle and disposable blade system, explaining why its weight, balance, and control outperform plastic cutters. It clarifies handle--blade compatibility (No. 3/7 with blades 10, 11, 12, 15; No. 4 with blades 20--22) and emphasizes safe assembly/removal with pliers or a blade remover plus proper sharps disposal. Key material advantages (316L stainless, autoclavable, non-slip grips) and a simple starter kit (Handle No. 3, No. 11 blades, small pliers) help you build a precise, durable setup.
Matching Blades to Handles: The No. 3 vs. No. 4 Compatibility Guide
Think of a BP Scalpel Handle system like a power drill and its bits. Just as a heavy-duty masonry bit won't fit into a jeweler's drill, surgical blades rely on a specific connection point called the "fitment" to function safely. This raised, key-like ridge on the handle's tip must match the slot in the blade perfectly to lock in place. If you try to force a mismatch, the blade will not secure, leaving you with a dangerous, wobbling edge rather than a precision instrument.
Most general tasks rely on two main BP handle types : the No. 3 and the No. 4. The difference between number 3 and 4 handles is primarily about scale. The BP Scalpel Handle No. 3 is the industry standard for intricate detail work, ideal for graphic arts or wood carving. In contrast, the No. 4 is heavier and wider, designed for cutting through resistant materials like thick leather or rubber.

To ensure a safe lock, use this simple scalpel blade compatibility chart:
- Small Fitment (Handle No. 3, No. 7): Fits Blades 10, 11, 12, 15
- Large Fitment (Handle No. 4): Fits Blades 20, 21, 22
Notice that the specialized BP Handle No. 7---a long, pen-like tool favored for deep reach---shares the "Small Fitment" with the No. 3. Always check the packaging numbers before you buy; a No. 11 blade will simply fall off a No. 4 handle. With your components correctly matched, you are ready to focus on the technique required to mount them safely.
Handling the Edge: Safe Assembly and Maintenance
Securely mounting your new edge transforms a static piece of metal into a high-performance tool. While disposable plastic holders are common for one-off tasks, investing in a reusable handle made from 316L Stainless Steel offers superior balance and the ability to withstand high-heat cleaning. This "autoclavable" quality ensures your gear remains sanitary and rust-free for years. To load the instrument, never use your bare hands; instead, learn how to attach a surgical blade to a handle safely by grasping the non-cutting edge with pliers and sliding it onto the mounting slot until it snaps audibly into place.

The non-slip grip surgical instrument design provides stability during intricate cuts, but that control must extend to cleanup. The most critical safety step involves removing dull blades with a blade remover or hemostat rather than prying them loose with fingernails. Once detached, these used edges cannot simply be tossed into a standard bin where they might injure someone later. Instead, drop them immediately into a dedicated sharps disposal container---a rigid, puncture-proof box essential for any serious workshop. Mastering these protocols ensures your workspace remains safe as you prepare for the final step: assembling your custom toolkit.
Building Your Precision Kit: The Action Plan for DIY Experts
Adopting BP Handles & Holders upgrades your work from simple cutting to surgical precision. While originally designed as the best tools for fine tissue dissection, this system offers hobbyists unmatched control and value compared to disposable knives. Navigate the common sizes of surgical blade holders confidently with this starter kit:
- Choose Handle No. 3 for general versatility.
- Get No. 11 blades for fine detail.
- Buy a pair of small pliers for safety.
Q&A
Question: What makes BP (Bard-Parker) handles better than disposable plastic cutters?
Short answer: BP Handles & Holders provide the weight, balance, and control that lightweight plastic cutters lack. You keep a reusable, weighted 316L stainless steel handle with a non-slip grip and only replace the disposable blade. The result is steadier, more precise cuts, plus long-term durability and hygiene since the handles are autoclavable for high-heat cleaning.
Question: How do I choose between Handle No. 3, No. 4, and No. 7?
Short answer: Choose by scale and reach. No. 3 is the go-to for intricate detail work (e.g., graphic arts, wood carving). No. 4 is heavier and wider for tougher materials like thick leather or rubber. No. 7 shares the small-blade fitment with No. 3 but has a long, pen-like form for deep reach. Match the handle to the material's resistance and the access you need.
Question: Which blades fit which handles, and what happens if I mismatch them?
Short answer: Use the correct fitment to lock blades safely:
- Small fitment (Handles No. 3, No. 7): Blades 10, 11, 12, 15
- Large fitment (Handle No. 4): Blades 20, 21, 22 Forcing a mismatch won't secure the blade---e.g., a No. 11 blade will fall off a No. 4 handle---leaving a dangerous, wobbly edge instead of a precision tool.
Question: How do I safely attach and remove blades?
Short answer: Never use bare hands. To attach, grasp the blade's non-cutting edge with pliers and slide it onto the handle's mounting slot until it snaps audibly into place. To remove, use a blade remover or hemostat rather than prying with fingers. Immediately drop used blades into a rigid, puncture-proof sharps disposal container---never a regular trash bin.
Question: What's a simple starter kit to get surgical-level precision in the workshop?
Short answer: Start with Handle No. 3 for versatility, pair it with No. 11 blades for fine detail, and add a small set of pliers for safe loading. This setup gives you balanced control, precise cuts, and a safe workflow you can build on with additional blade shapes as needed.
Question: Why upgrade to BP (Bard-Parker) handles instead of disposable plastic cutters?
Short answer: BP Handles & Holders pair a reusable, weighted 316L stainless steel handle with disposable blades to deliver greater stability, balance, and control than lightweight plastic cutters. The non-slip grip improves precision, and the handle’s autoclavable construction enables high-heat cleaning for long-term durability and hygiene.
Question: What is “fitment,” and how do I match blades to handles safely?
Short answer: Fitment is the key-like ridge on the handle tip that must match the blade’s slot to lock securely. Choose blades by fitment size to avoid a dangerous, loose blade (e.g., a No. 11 will fall off a No. 4 handle):
- Small fitment (Handles No. 3, No. 7): Blades 10, 11, 12, 15
- Large fitment (Handle No. 4): Blades 20, 21, 22
Question: How do No. 3, No. 4, and No. 7 handles differ in use?
Short answer: Choose by scale and reach. No. 3 is the industry standard for intricate detail work (graphic arts, wood carving). No. 4 is heavier and wider for resistant materials like thick leather or rubber. No. 7 shares the small-blade fitment with No. 3 but has a long, pen-like form for extended reach.
Question: How do I attach, remove, and dispose of blades safely?
Short answer: Never use bare hands. To attach, grip the blade’s non-cutting edge with pliers and slide it onto the handle until it snaps audibly into place. To remove, use a blade remover or hemostat—never pry with fingers. Immediately place used blades in a rigid, puncture-proof sharps container, not regular trash.
Question: What simple starter kit should I buy to get precise results quickly?
Short answer: Start with Handle No. 3 for versatility, pair it with No. 11 blades for fine detail work, and add a small pair of pliers for safe loading and removal. You can expand later with additional blade shapes as needed.